Showing posts with label How To. Show all posts

Saturday, June 6, 2020

The Sweetest Unsweet Life - Dole Whip


Three years ago this May, we learned that Bryleigh was allergic to cane sugar, among 9 other things.  We praised the Lord for answers to what had been causing so many health issues for Bryleigh, but we were devastated as we began to realize exactly what this diagnosis meant for her (and for us).  Every expectation I had of baking in the kitchen with my daughter, every way I knew to celebrate any and all special occasions, and anything my daughter loved to eat were all officially a thing of the past.  The beginning was survival mode for all of us, then we moved into the learning and growing phase, and now we are officially at the point that we want to share with the world all we have learned along the way.

Bryleigh has asked for a while if she could have a YouTube channel, but to be honest, I never thought it was something we would actually do...until I began to get this little vision of the two of us in the kitchen sharing all of our favorite recipes.  And just like that, God pieced my heart back together and showed me just how faithful He is in redeeming what seemed to be complete ash, our very own rainbow in the sky reminding us that He is so good to us.

We decided to start simple and fun with a tasty summer treat in honor of summer officially being here! And the Texas heat is here, right on time.  We had a trip planned to Disney this summer over 4th of July, but thanks to the Coronoa virus, it has officially been postponed.  That will not, however, keep us from bringing a little Disney magic to our entire summer, so it was the perfect way to kick off THE SWEETEST UNSWEET LIFE!


This simple 3 ingredient recipe is super easy to make and will leave your taste buds satisfied in no time, not to mention cooling you down in the 100* Texas heat!!


For all of Bryleigh's ice cream treats, we use Blue Bell's No Sugar Added Vanilla Ice Cream.  It can occasionally be out of stock at our local Kroger, but for the most part, we have no trouble finding a gallon or two.  It is also available in pint size, most of the time.

In addition to your ice cream base, you will also need 4 ounces of pineapple juice and 2 cups of frozen pineapple.  We had trouble finding any, so we just went ahead and bought a fresh pineapple, cut it into cubes, and then froze 2 cups.  (Speaking of fresh pineapple, we may never be the same after visiting Maui, Hawaii last year and getting to tour the MAUI GOLD pineapple farm and eating fresh pineapple straight off the plant.)


This recipe can be easily modified to make various versions, including placing it back in the freezer and serving it more like ice cream or by adding more pineapple juice or milk to it for a creamier, drink type treat.  It would also be fun to pour the mixture into popsicle molds and have on hand for those hot summer afternoons after a morning of playing outside!


Tuesday, May 19, 2015

Our Bible Study Basket


This year, for Mother's Day, I had the opportunity to up my game in getting physically fit.  My husband was hinting with lots of questions about getting me something I've been wanting for a while...a FitBit.  It's on my "Wish List" board on Pinterest, I've stalked their website doing all kinds of research, and I've thought long and hard about how it would/could make a difference for me in continuing my journey to getting even healthier.

The more I thought about it though, the more I knew I needed to let him know what I really wanted...a basket.  It's not glamorous, or tech savy, or even pink with sparkles. {Last years Mother's Day present was pink, sparkly, AND glamorous...}  But I can guarantee you that it is a gift I will ALWAYS remember.

I messaged Brad the "list" of what I wanted for my Bible Study basket based on some different things I'd seen on different internet sites and social media.  His response back was, "You want pens and highlighters for mother's day? LoL"  {And he'll be the first second to say I always get what I want.  Mom would probably say it first.}  So technically, I ended up convincing him to go along with it by calling it a "Shopping Trip."  I mean, what momma doesn't want to just SHOP!?  And I always love fun time with my family!

"Show me your nose, Bryleigh" ...such a little lady!

This is something that I've been working on/putting together, organizing, and reorganizing for years and I am so pleased with how it all {FINALLY} turned out.


So what's in the basket, right?  What's shown above is what we got on our shopping spree for Mother's Day, including a super cute new Rangers shirt for our next trip to the ball park {which has absolutely nothing to do with the basket and its purpose} ;)  It also includes mason jars, pens and highlighters, some craft sticks, journals, date stamp, and a few books that have been on my Wish List.


We'll be using the craft sticks and two of the mason jars for Bryleigh's prayers each night.  Each stick has a different family member's name on it, so she'll draw one out, pray for them, and then drop it in the second jar.  I love getting her involved in doing things like this, and it's NEVER to early to start prayer habits, especially praying for others!

- Our FIRST night to use the sticks -
We prayed for Uncle Steve and Aunt Renee's family.

The second two mason jars have all of the pens (including Sharpie fine point markers *FAVES*) and highlighters to use during my bible studies each day (based on the GoodMorningGirls guide to Bible Study).  I got two new composition journals, one for journaling my daily gifts (#1000gifts) and the second for taking notes during my bible studies (@amyhale's instagram is my inspiration for this part).  I also got a date stamp to use both in my journals and in our family bible.  {We'll be using a journaling bible to stamp the date and add notes to passages that mean something to our family in the future.}

I have put together a Prayer and Bible Study journal that has all of the things I've found online over the past few years to encourage a deeper prayer time and more in-depth bible study.  I've tried this a few times before, but this is my favorite way to-date, and the one I will probably stick with for a while.


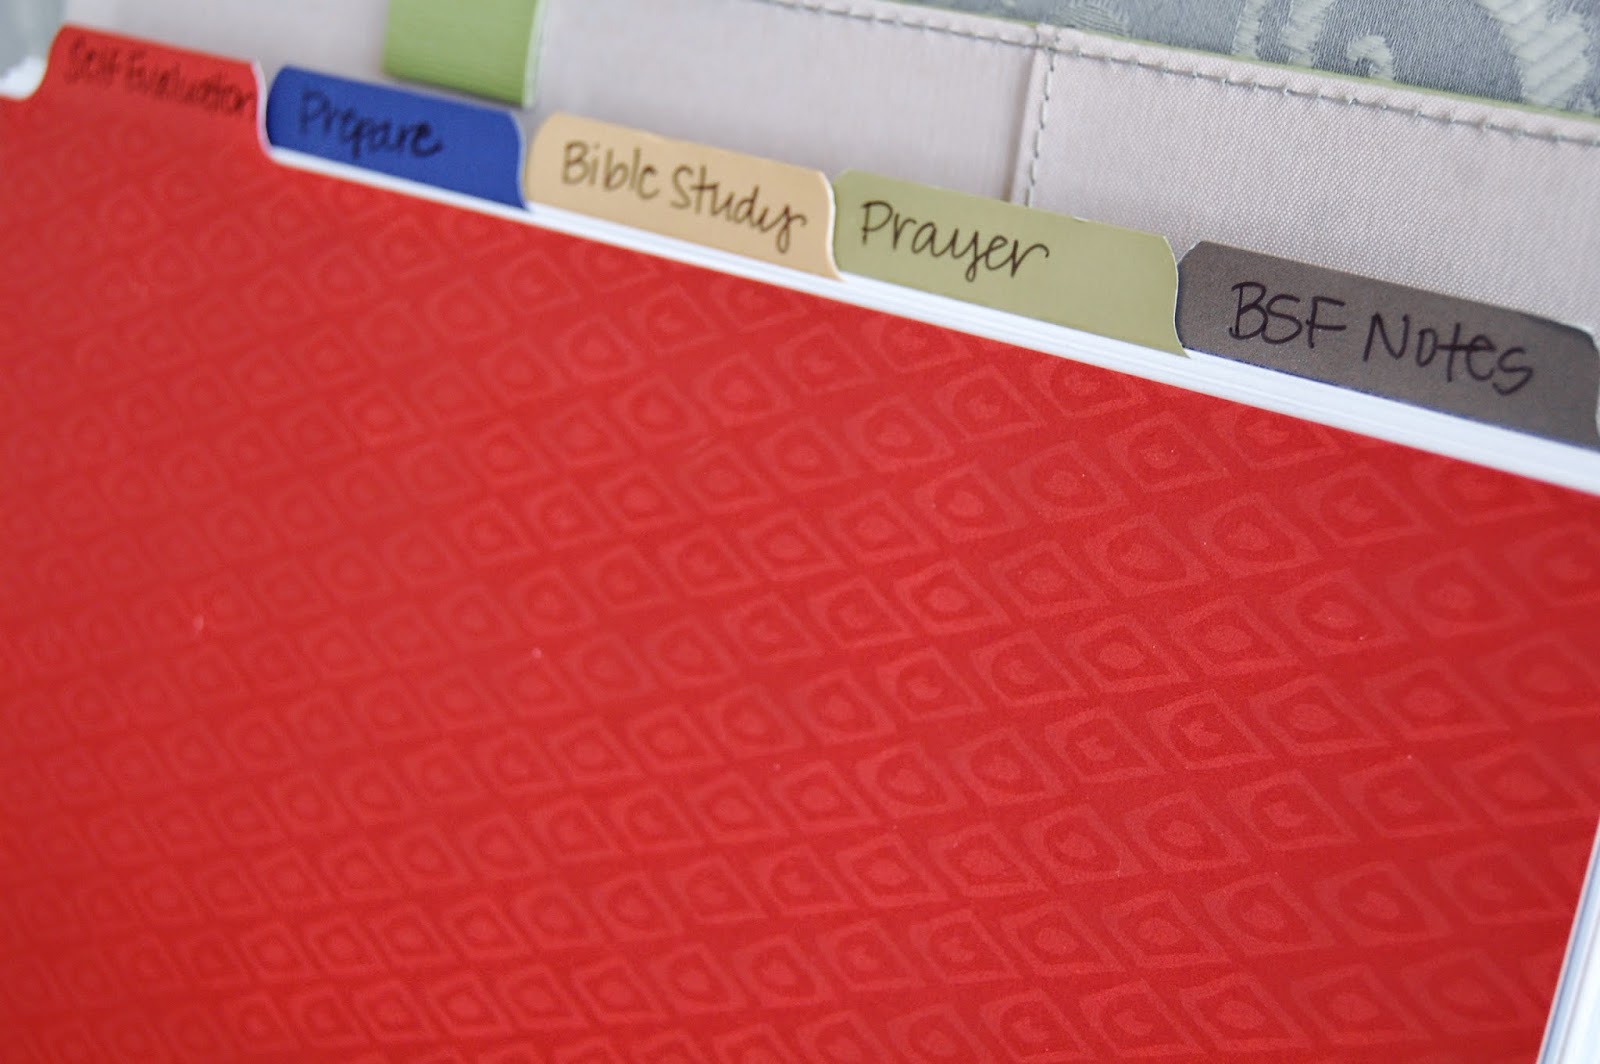
Included in the notebook are 5 different sections: Self Evaluation, Preparation, Bible Study, Prayer, and BSF Notes.


Self Evaluation
This section contains the verse I have selected for 2015, and it will also have my life's Mission Statement once I've completed it.  I'm praying through that right now and will add it to the blog once I've got it finished.  I am excited to be able to pray through my Mission Statement each day and recall what the Lord has set me on this earth for.  We each have a purpose, and we must be intentional in living it out!

Prepare
I've learned that before opening your bible, it's good to prepare your heart.  Open your hands to what the Lord has for you, clear your mind, and some days you may even need to clean up your heart.  I used a post from Amy Hale's Instagram regarding how to pray before, during, and after our bible study (from "Women in the Word," which is at the top of my "To Read" list).  She also posted a template for confession from the :IFGathering she was a part of.  Both of these have a few tweaks on my part to make them a little more personal for me.


Bible Study
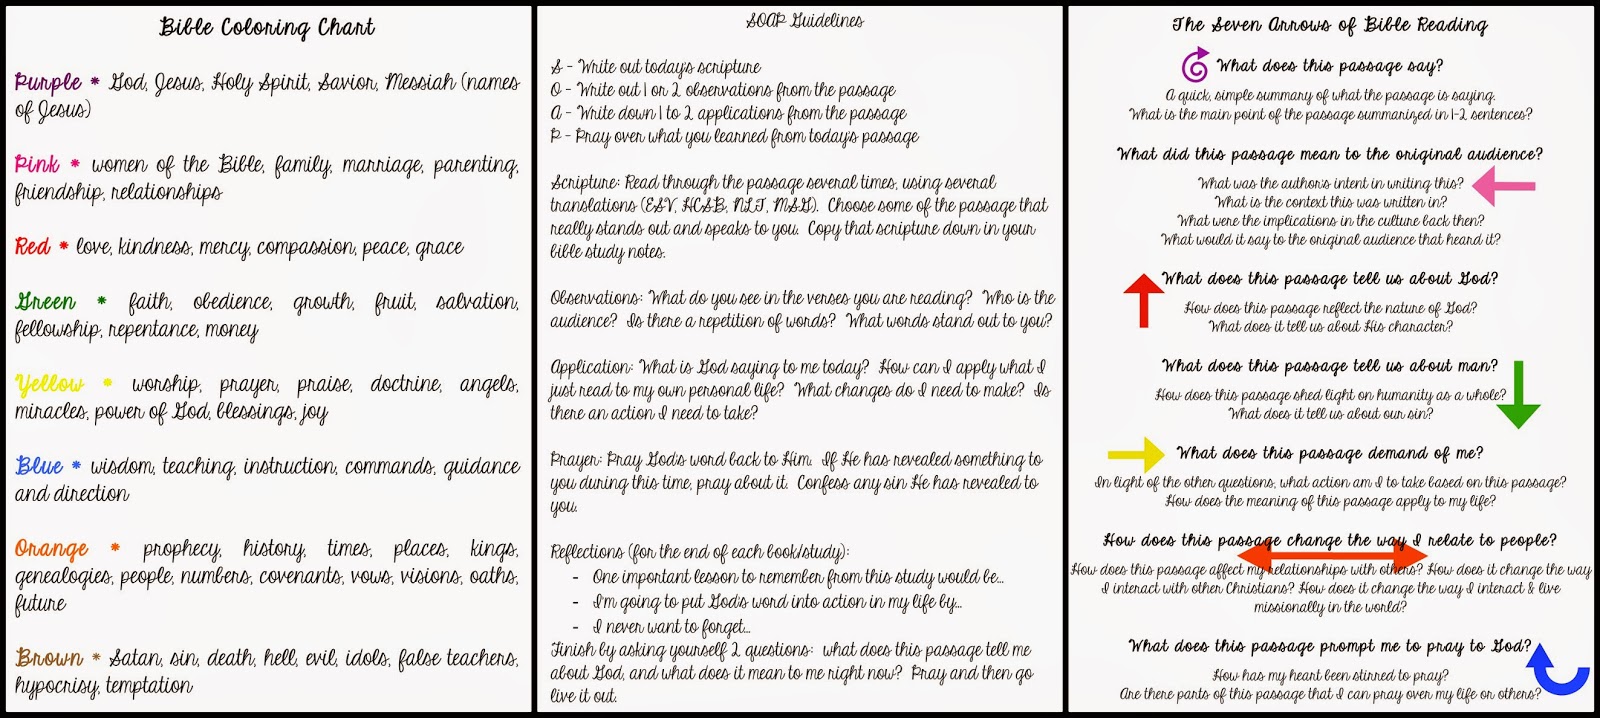
Under the "Bible Study" section, I have a few different tools I use to help deepen my understanding and get me involved with what I am reading.  The first tool is the Good Morning Girl's "Bible Study Highlighting Guide."  This allows you to view passages in your bible from a broader standpoint and gives you a guide to follow throughout your entire bible.  This helps you to categorize what you are reading to help with a deeper understanding of the passage.  Another way to develop a deeper understanding of the passage is to answer some different questions.  I have used both the SOAP method (also from Good Morning Girls) and the 7 Arrows method (which I love!). Both of these get you involved with the scripture, leading you to take action as opposed to just reading the verses.


Prayer
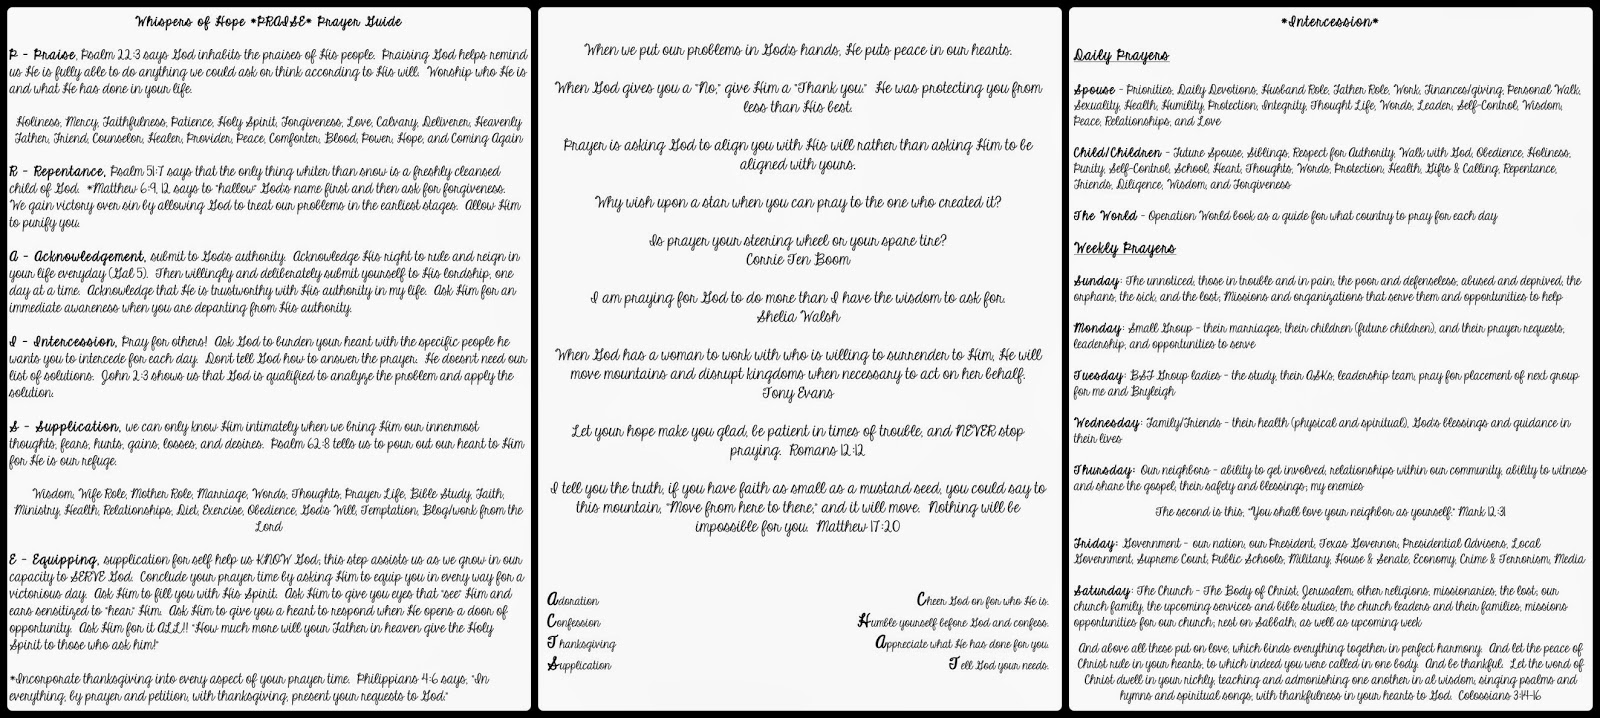
This section is one that I have been working on and refining for quite some time.  I've used various methods for prayer journals and done a few different bible studies to grow in my prayer life, and this is the culmination of what I have found to work for me personally.  The first part is just an overview with some of my favorite quotes and verses regarding prayer as well as two acronyms that I saw in a lot of my studying - ACTS and CHAT.  The second part is from Beth Moore's "Whispers of Hope" devotional book that teaches you how to pray based on the acronym PRAISE.  By the end of the study, and still to this day, my prayers are filled with "Thank your Lord..." as opposed to "Give me Lord."  It definitely challenged me and revolutionized the way I pray!  The final page expands on one of the letters in the PRAISE Guide - I, for Intercession.  I have worked and reworked my guide for daily/weekly prayer and this list is the one that I have found to be most inclusive and works best for my personal prayer life.


BSF Notes
The final section I have in my notebook is personal for me, but it is set up for all of my notes and ASKs for a weekly bible study I attend throughout the year called BSF.  This is where I will keep my weekly notes as well as the weekly prayer requests for the group of ladies I meet with each week.

**If you would like help creating your own Prayer and Bible Study Notebook, Family Bible Study Basket, or you would like PDF Files of the ones I have shown above to create your notebook, please email me at carriehammons@ymail.com or comment below with your email address.**

Friday, November 15, 2013

Saying Thank You - Gifts for Your Hostesses

During this season of our lives, Brad and I have been showered with love by so many people that mean so much to us.  There really isn't a way to adequately say "Thank You" to those people that spend so much time and money to make a day feel so special for you and your family, but I always enjoy trying!

These are our sweet hostesses for the Arlington and Sulphur Springs showers that helped us get ready for our sweet baby girl.  (They also happen to be some of the same hostesses that gave our wedding showers.)

With the holidays right around the corner, lots of friends and family will be hosting parties that you'll attend as well, and it would be a nice gesture to surprise them with a little "Thank You" gift as well.

So how do you let them know you appreciate them?

1.  Say It.  First of all, TELL them thank you (before, during, and after the event).  Like I said, you won't really be able to adequately thank them for all they've done, but you can sure try!

2. Write It.  On the Hostess Gift you are going to present them, add some sort of handmade or handwritten card that tells them how much you appreciate them for what they did for you.  You can make this personal to each hostess, or make it personal to the event if there are multiple hostesses.

For the Baby Showers that were given in honor of our sweet little girl, I attached the following note to each of the hostess gifts:

I created this thank you card from the theme on the invitation of our first
shower, and printed it in business card size for the first set of hostess gifts
and 4x6 photo size for the second set of gifts.
3.  Gift It.  You might not be able to thank your hostess as much as you'd like to, but coming up with a creative or thoughtful gift will definitely make an impact.  Don't think that you have to spend a whole lot of money either.  They have offered to host an event where you were invited or even in your honor, so they knew that it would require some time and money.

Both of our showers for Bryleigh were given during the Fall season, so I knew that I could do something related to that.  I also made the gifts personal in using the "Sugar and Spice" quote considering we'll be having a baby girl.  This line of thought is what led me to the idea of the muffins and cookies.  I've craved a whole lot of cinnamon during the pregnancy, so I thought it would add a personal touch to include that in the gifts.  Both of those items covered the "Sugar" category.

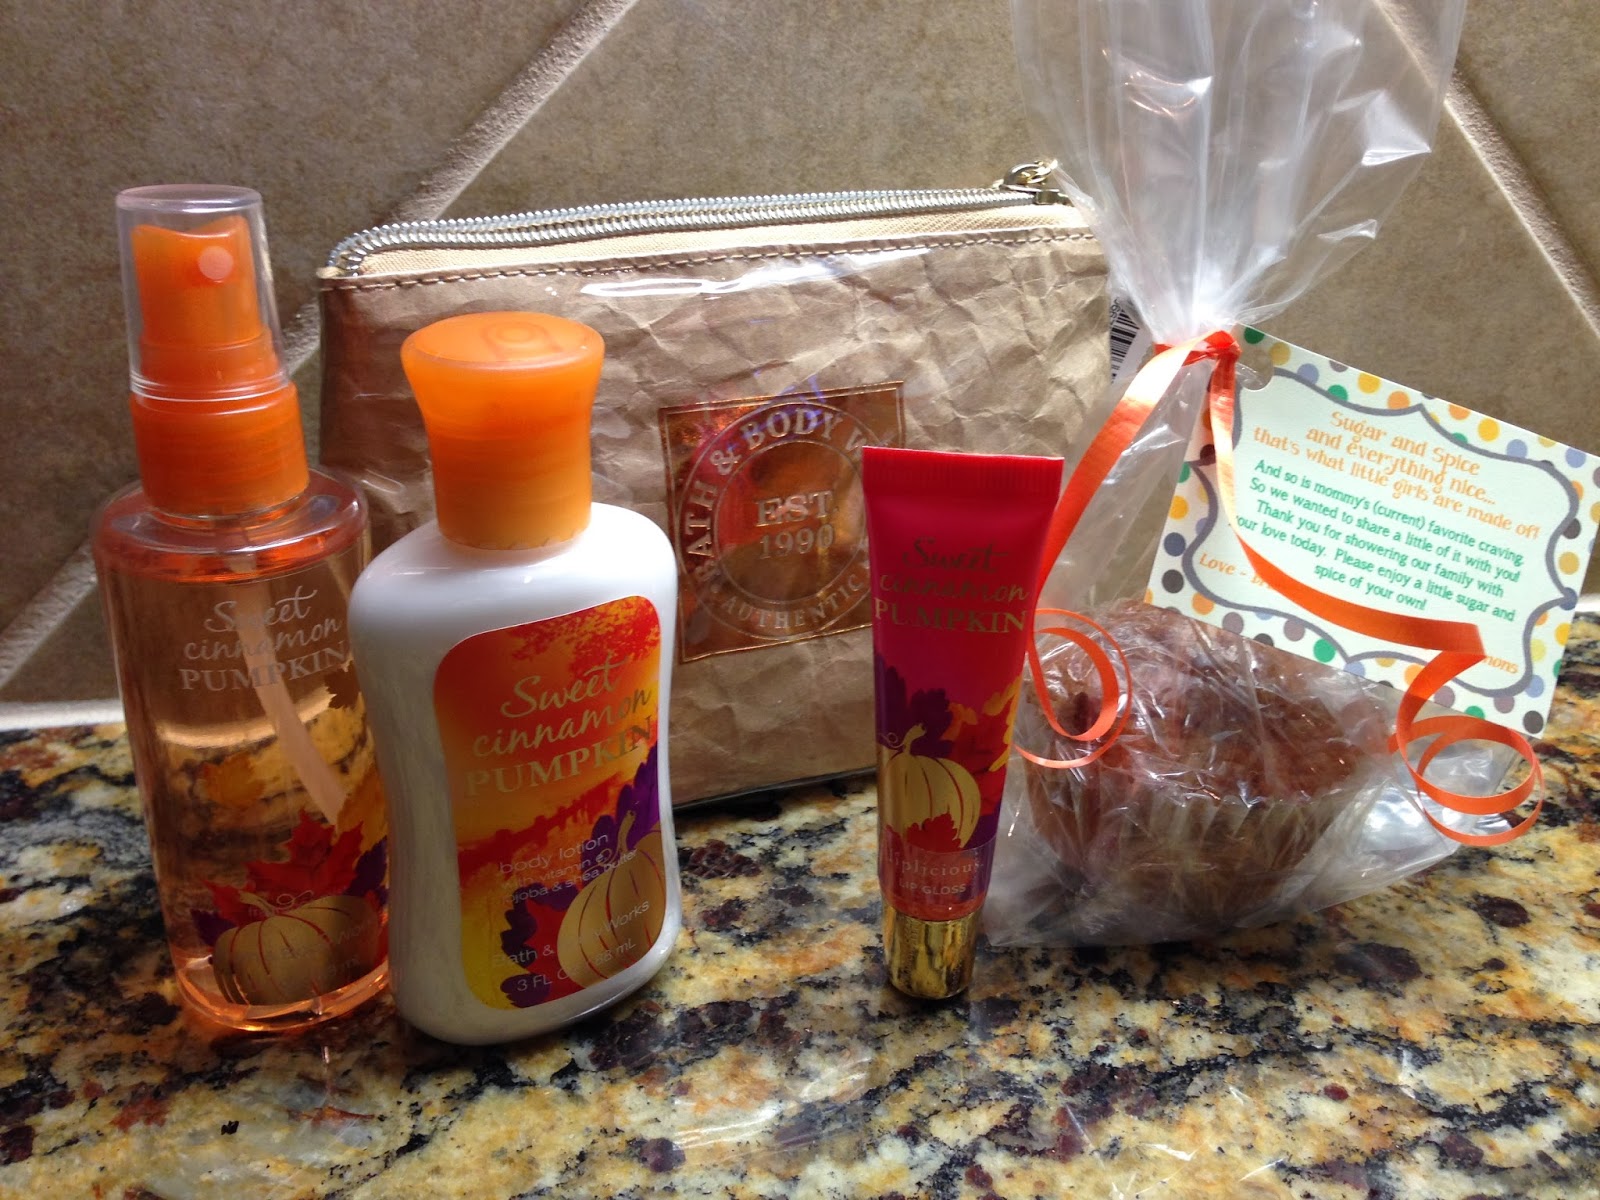
Brad picked out the "Spice" portion of the hostess gift for the Arlington shower by suggesting Bath and Body Works gift sets from the new Fall line.  It was PERFECT!

Sugar - Cinnamon Creme Coffe Cake (muffins) - Homemade!
Spice - Sweet Cinnamon Pumpkin gift set from Bath and Body Words
The ladies that helped host our Sulphur Springs shower had been requesting some of my dad's famous Hopkins County Stew (they were sad to miss the Stew Festival a few weeks ago!), so I knew that was the PERFECT "Spice" item to have for them.  I purchased the jars at Ikea and then asked my dad if he would "help" with the stew.  (He ended up making the whole batch himself...)  Needless to say, they jumped up and down when Brad and I walked over and handed them their jars!  It was the perfect way to let them know how much we appreciated all they had done for us.


Sugar = Snickerdoodle cookies from Tiff's Treats (My all time favorite cookies!!)
Spice = Hopkins County Stew - Homemade!
If you are looking for some ideas for an upcoming party, give these a try!

Baby Showers:
1. Sugar and Spice (as shown above) for the hostesses of a Baby Girl shower.
2. Manicure/Pedicure set (or gift card to a local salon) - "Thank you for making sure our little lady is perfectly polished."  You could also purchase a bottle of polish in the color representing your gender and simply add a tag for "It's a Boy!" or "It's a Girl!"
3. Monogrammed umbrella - "Thank you for showering us with love."
4. Shower gift set (bubble baths, lufas, shampoo, conditioner, razors, etc) - "From our shower to yours. Thanks for sharing your love today."
5. Do a little "DIY" project.  When you buy supplies to put cute gifts together, you can end up spending a lot less than if you were to go out and buy that item in the store, and the gift comes with a very personal touch because you took the time to make the gift.  Ideas include: magnetic chalkboard signs on silver platters, wooden picture frames, crosses, or monograms, stationary, etc.  (If you have sewing/embroidery skills, then you're sure to wow them with some homemade, personalized gifts!)

Wedding Showers:
1. Personalized address stamps
2. Candle holders, crosses, and other home decor pieces
3. Candles! My all time favorite candle would have to be Bird of Paradise by Circle E...there's nothing wrong with sharing some of YOUR favorite things in the form of a "Thank You" gift for your hostesses.
4. One of my favorite ideas would be a cookbook wrapped in a dishtowel with a cooking utensil of some sort tied on the outside.
5. A cutting board (could be customized depending on your budget) with a cheese knife

Holiday Parties:
1. Spa in a Jar (or a gift card to the spa) - Who doesn't want a cute mason jar filled with lots of goodies??  And after hosting a holiday party in the middle of the holiday season, your hostess is sure to need some "spa" time.  This can include bath salts, sugar scrubs, bubble baths, lufas, etc.  **If you'd like to spend a little more, you could do a monogrammed robe and slippers.
2. Homemade goodies on a festive platter.  The holidays always tend to bring out the inner baker in everyone, so while you are whipping up some sweet treats for your family, set some aside for your hostesses.  You can give them something that will last a little longer by putting those treats on a festive platter or reusable bags/boxes.
3. Personalized items.  There are countless websites where you can add monograms or names to just about anything.  Some of my favorites would be the planners, scarves, and stationary.
4. Hostesses of your Holiday Parties probably have a heart for hosting a lot of parties...all the time...for any occasion, so any gifts they could use to prepare for a party or during the party would make for a great way to say "Thank You."  These could include aprons, personalized baking dishes or carriers, or pretty much any item from Williams-Sonoma!
5. Holiday parties usually mean COLD weather, so a nice Hot Chocolate basket filled with your favorite hot chocolate mix, marshmallows and/or whip cream, and some cute holiday mugs (or those nice travel mugs if they are on the go a lot) are a great way to help your hostess relax after the last guest has left and the last piece of silver is put away.

Tuesday, August 20, 2013

Chalking it Up


I've been tracking my bump progress (or lack thereof) with an old mirror I turned into a chalkboard, and I've had lots of requests for some information on how I've been making them each week...so here you go!


First off, you'll need your supplies - your chalkboard, chalk markers (I find these MUCH easier than regular chalk, your lettering shows up better, and it doesn't get wiped away when you brush your hand across it), a computer with Word and/or Photoshop, a printer, regular chalk (I usually just use white), and a pencil or pen.

Once you have everything you need, you'll want to create your layout - If I am doing something basic, I will create it on Microsoft Word.  If I want the words to overlap or add any type of design elements, I'll create it in Adobe Photoshop Elements.


You want your layout to be true to size.  For example, the chalkboard I've been using is a little over 11 inches wide, so I will create my layout in Landscape, using a font size that is sufficient for what I want to transfer over to the chalkboard.

Once your layout is complete, you will want to print out your design on plain white paper in black ink.  This is easiest to use because you'll be able to see the font through the page.  This is important, because your next step is to flip the page over and you will color over your design with the regular chalk you have on hand.


Once you have completed colored over your design in the chalk, you will want to flip it over and place it directly on the chalkboard where you would like for your design to end up.  At this time, you will want to trace over the design with your pen or pencil.  (Note that any marks you make will create the same marks underneath in chalk, but they can easily be wiped away if any are a mistake.)  When you have completely traced around the design, you can remove your printed copy and you will be left with a chalk outline as shown below.


At this point, you will begin to color in your design with the chalk markers (you can also use regular chalk if you'd like).  I usually start with drawing the outline over the existing chalk and then go back and color in the letters and design afterwards.